1. 사건의 발달

도메인을 구매하기 전에는 AWS EC2의 IP를 사용하여 Swagger를 배포하였다. Swagger를 통해 서버로 요청을 보내게 되면, Swagger 주소와 서버 주소가 동일하기 때문에 CORS 문제를 고민할 필요가 없었다.

이젠 도메인을 구매하고 SSL 인증서를 발급받아 도메인 주소로 Swagger를 접속하도록 하였다.

그런데 GET 요청을 제외한 나머지 HTTP 메서드에 대해서 전부다 403 Invalid CORS request 오류가 발생하였다. 도메인에 맞춰서 Cors와 Swagger 설정을 했음에도 해결되지 않았다.
하루 내내 붙잡고 있어도 해결되지 않아, 게임으로 잠시 도피하고…. 다음날 처음부터 차근차근 해보니 해결책을 찾았다. 동일한 개발 환경에서 이 오류가 발생하는 사람이 있을 것이라 생각하고 해결 과정을 작성해 보겠다.
2. 개발 환경
- Java 17
- SpringBoot 3.3.2
- SpringDoc Swagger 2.6.0
- AWS EC2
- Nginx, Certbot
백엔드 서버는 EC2에 배포되어 8080 포트에서 실행되고 있으며, http를 통해 80 포트로 들어오는 요청을 리버스 프록시(reverse proxy)를 통해 8080 포트로 요청하도록 하고 있다. Let`s Encrypt를 통해 도메인에 SSL 인증서를 발급받아 https 프로토콜을 사용한다.
3. 도메인을 사용하기 전에는 CORS 문제가 발생하지 않는다.
도메인을 연결하지 않은 상태이기 때문에, Swagger 접속 주소와 서버 주소가 동일하다. 동일한 Origin을 사용하기 때문에 CORS 문제가 발생하지 않는다. 왜냐하면 CORS 문제는 프로토콜(Protocol), 도메인(domain), 포트(port) 중에 다른 게 있어야 발생하는 문제이기 때문이다.
Origin이 동일하기 때문에, 브라우저를 통해 서버로 요청을 보냈을 때, 응답 헤더에 CORS와 관련된 허용된 Http Headers, Method, Origin이 포함되지 않는다.
 cache-control: no-cache,no-store,max-age=0,must-revalidate
 connection: keep-alive
 content-type: application/json;charset=UTF-8
 date: Thu,29 Aug 2024 06:05:20 GMT
 expires: 0
 keep-alive: timeout=60
 pragma: no-cache
 transfer-encoding: chunked
 vary: Origin,Access-Control-Request-Method,Access-Control-Request-Headers
 x-content-type-options: nosniff
 x-xss-protection: 0
또한 서버의 자원을 정상적으로 응답받는다.

4. 도메인을 구매하고 SSL 인증서를 발급받는다.
도메인으로 todobuddy.site를 구매하였으며, 서브 도메인으로 www.todobuddy.site를 사용한다. 서브 도메인으로 들어오는 요청을 서버로 보내기 위해서 Nginx를 설치한다.
4-1. Nginx 설치
$ sudo apt update
$ sudo apt install nginx -y
4-2. Nginx 기본 설정 파일 수정
# Nginx 설정 파일 수정
$ sudo nano /etc/nginx/sites-available/default
Nginx를 설치하면 기본 설정 파일에 다음과 같이 작성되어 있다. 기본적으로 80 포트에서 HTTP 요청을 수신을 대기하며, IPv4와 IPv6 모두 요청을 수신한다. 클라이언트로부터 요청된 경로에 파일이 존재하지 않는다면 404 오류 페이지를 반환한다.
server {
    listen 80 default_server;
    listen [::]:80 default_server;

    root /var/www/html;

    index index.html index.htm index.nginx-debian.html;

    server_name _;

    location / {
        try_files $uri $uri/ =404;
    }
}
Nginx 기본 설정 파일을 아래와 같이 수정한다. 서버 도메인에 HTTP 요청이 들어오면 리버스 프록시를 통해 로컬에서 실행 중인 서버로 요청을 전달한다. EC2 내부에 Nginx와 스프링부트 애플리케이션이 실행되므로 localhost로 리버스 프록시가 발생하도록 한다. 또한 스프링부트가 사용하는 포트를 8080으로 설정하였기 때문에 8080 포트로 요청을 보내야 한다.
server {
    listen 80;
    server_name {서버 도메인};

    location / {
        proxy_pass http://localhost:8080;
        proxy_set_header Host $host;
        proxy_set_header X-Real-IP $remote_addr;
        proxy_set_header X-Forwarded-For $proxy_add_x_forwarded_for;
        proxy_set_header X-Forwarded-Proto $scheme;
    }
}
4-3. Nginx 설정을 테스트 및 재시작한다.
- 수정한 Nginx 파일이 문제없이 사용되는지 테스트한다.
$ sudo nginx -t
- Nginx를 재시작한다.
$ sudo systemctl restart nginx
4-4. Certbot 설치
EC2 내부에 Certbot을 설치하여 Let`s Encrypt SSL 인증서를 발급받을 수 있도록 한다.
$ sudo apt install certbot python3-certbot-nginx -y
4-5. SSL 인증서 발급
$ sudo certbot --nginx -d {서버 도메인}
위 명령어를 입력하면, 이메일 주소 입력을 요구한다.

참고로 존재하지 않는 도메인을 입력하면 아래 오류가 발생한다.

5. Cors 설정
5-1. 문제가 발생한 Cors 설정 클래스
아래 설정 파일이 잘못되어 어제 하루 내내 문제가 발생했다. 그 이유는 @Value를 사용하여 환경변수 값을 주입받을 수 있는데, 이 애너테이션을 static 필드에 사용하면 null이 저장된다.
static 변수의 경우 클래스 로딩 시점에 초기화되며, 이는 스프링 컨텍스트의 초기화가 발생하기 전에 발생한다. 반면에 @Value을 통해 값을 주입받는 것은 스프링 빈의 초기화 과정에서 일어나므로 둘 간의 생명주기가 일치하지 않는다. 따라서 static 필드에는 null이 저장되었고, 이 문제로 인해서 서버 도메인을 입력받지 못하여 CORS 설정이 되고 있지 않았던 것이다…!
@NoArgsConstructor(access = AccessLevel.PRIVATE)
public class CorsConfig {

    @Value("${server.domain}")
    private static String domain;

    public static CorsConfigurationSource corsConfiguration() {
        CorsConfiguration configuration = new CorsConfiguration();

        // allowedOriginPatterns : 리소스를 허용할 URL
        List<String> allowedOriginPatterns = new ArrayList<>();
        allowedOriginPatterns.add("http://localhost:3000");
        allowedOriginPatterns.add("http://127.0.0.1:3000");
        allowedOriginPatterns.add(domain);

        List<String> allowedHttpMethods = new ArrayList<>();
        allowedHttpMethods.add("GET");
        allowedHttpMethods.add("POST");
        allowedHttpMethods.add("PUT");
        allowedHttpMethods.add("DELETE");
        allowedHttpMethods.add("PATCH");

        configuration.setAllowedOrigins(allowedOriginPatterns);
        configuration.setAllowedMethods(allowedHttpMethods);

        configuration.setAllowedHeaders(List.of("*"));
        configuration.setAllowCredentials(true);

        UrlBasedCorsConfigurationSource source = new UrlBasedCorsConfigurationSource();
        source.registerCorsConfiguration("/**", configuration);

        return source;
    }
}
5-2. 수정된 Cors 설정 클래스
static 필드를 제거하고, 멤버 변수로 사용될 수 있도록 한다. corsConfiguration()에서 domain 필드를 사용할 수 있도록 static을 제거한다.
- static String domain → String domain
- static CorsConfigurationSource corsConfiguration() → CorsConfigurationSource corsConfiguration()
@Configuration
public class CorsConfig {

    @Value("${server.domain}")
    private String doamin; // static 변수에 @Value를 사용하면 null이 저장된다.

    public CorsConfigurationSource corsConfiguration() {
        CorsConfiguration configuration = new CorsConfiguration();

        // allowedOriginPatterns : 리소스를 허용할 URL
        List<String> allowedOriginPatterns = getAllowedOriginPatterns();

        // allowedHttpMethods : 허용할 HTTP 메서드
        List<String> allowedHttpMethods =
	        List.of("GET", "POST", "PUT", "DELETE", "PATCH", "OPTIONS");

        configuration.setAllowedOrigins(allowedOriginPatterns);
        configuration.setAllowedMethods(allowedHttpMethods);
        configuration.setAllowedHeaders(List.of("*"));
        configuration.setAllowCredentials(true);

        UrlBasedCorsConfigurationSource source = new UrlBasedCorsConfigurationSource();
        source.registerCorsConfiguration("/**", configuration);

        return source;
    }

    private List<String> getAllowedOriginPatterns() {
        List<String> allowedOriginPatterns = new ArrayList<>();
        allowedOriginPatterns.add("http://localhost:3000");
        allowedOriginPatterns.add("http://127.0.0.1:3000");
        allowedOriginPatterns.add(doamin);
        return allowedOriginPatterns;
    }
}
6. SecurityFilterChain 설정
Cors 설정을 SecurityFilter에 등록한다.
.cors(cors -> {
    cors.configurationSource(corsConfig.corsConfiguration());
})
@Configuration
@EnableWebSecurity
@RequiredArgsConstructor
public class SecurityConfig {

    private final CustomUserDetailsService customUserDetailsService;
    private final JwtAuthenticationFilter jwtAuthenticationFilter;
    private final AuthenticationEntryPoint authenticationEntryPoint;
    private final CorsConfig corsConfig;

    @Bean
    public SecurityFilterChain securityFilterChain(HttpSecurity httpSecurity) throws Exception {
        return httpSecurity
            .cors(cors -> {
                cors.configurationSource(corsConfig.corsConfiguration());
            })
            .csrf().disable()
            .headers(headers -> headers.frameOptions().disable())
            .authorizeHttpRequests(
                authorizeRequest -> {
                    authorizeRequest
                        .requestMatchers("/api/users").permitAll() // 회원가입
                        .requestMatchers("/api/users/login").permitAll() // 로그인
                        .requestMatchers("/swagger-ui/**", "/swagger-resource/**", "/api-docs/**", "/v3/api-docs/**").permitAll() // Swagger
                        .requestMatchers("/api/users/check-email", "/api/users/password").permitAll() // 이메일 검증
                        .anyRequest().authenticated();
                }
            )
            .userDetailsService(customUserDetailsService)
            .sessionManagement(sessionManagement -> {
                sessionManagement.sessionCreationPolicy(SessionCreationPolicy.STATELESS);
            })
            .addFilterBefore(jwtAuthenticationFilter, UsernamePasswordAuthenticationFilter.class)
            .exceptionHandling(exceptionHandling -> {
                exceptionHandling.authenticationEntryPoint(authenticationEntryPoint);
            })
            .build();
    }

    @Bean
    public PasswordEncoder passwordEncoder() {
        return new BCryptPasswordEncoder();
    }
}
7. Swagger 설정 클래스 수정
Server 정보를 추가하지 않는다면, 기본적으로 Swagger는 요청 도메인과 서버 도메인을 동일하게 사용한다. 아래처럼 요청 도메인이 http://localhost:8080인 경우, API 요청 또한 http://localhost:8080 보내진다.
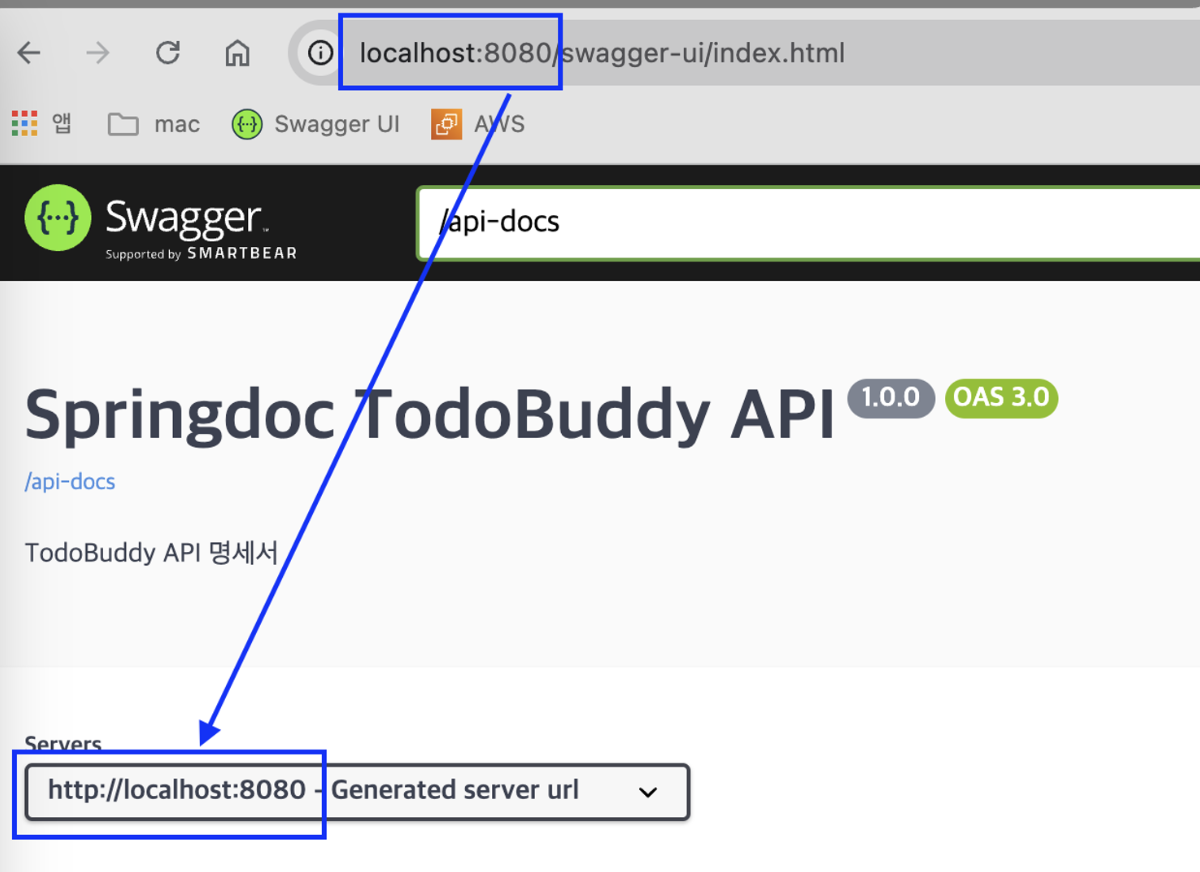
Server 설정을 하지 않으면 Swagger의 URL이 https://{서버 도메인}이면서 요청이 내부적으로 http://{EC2 IP 주소}로 전송된다. Nginx는 서버 도메인으로 오는 요청을 대기(listen)하고 있으나, 바로 서버 IP로 요청이 전달되므로 문제가 발생한다.
따라서 아래 Swagger 설정 클래스의 OpenAPI 설정 메서드에 Server 인스턴스를 생성하고 도메인 주소를 설정해줘야 한다.
@Bean
public OpenAPI openAPI() {

    Server server = new Server();
    server.setUrl(domain);

    return new OpenAPI()
        .components(new Components())
        .info(apiInfo())
        .addServersItem(server);
}
@Configuration
@SecurityScheme(
    name = "bearerAuth",
    type = SecuritySchemeType.HTTP,
    bearerFormat = "JWT",
    scheme = "bearer"
)
public class SwaggerConfig {

    @Value("${server.domain}")
    private String domain;

    @Bean
    public OpenAPI openAPI() {

        Server server = new Server();
        server.setUrl(domain);

        return new OpenAPI()
            .components(new Components())
            .info(apiInfo())
            .addServersItem(server);
    }

    private Info apiInfo() {
        return new Info()
            .title("Springdoc TodoBuddy API")
            .description("TodoBuddy API 명세서")
            .version("1.0.0");
    }
}
모든 설정을 마치고 Swagger에서 요청을 보내면 서버에서 응답을 내려준다!

8. 최종 동작 과정
- 클라이언트(Swagger)에서 https://{도메인 주소}에 요청을 보낸다.
- Nginx는 https://{서버 도메인}으로 오는 요청을 기다리고 있는다
- /etc/nginx/sites-available/default 여기서 서버 도메인으로 오는 요청을 listen 하고 있다.
- Nginx는 이 요청을 받아, 해당 요청을 내부의 http://localhost:8080으로 전달한다. localhost:8080은 스프링부트 애플리케이션이 실행되고 있는 서버이다.
- 스프링부트 애플리케이션은 이 요청을 받아 처리하고 응답을 Nginx로 반환한다.
- Nginx는 이 응답을 받아 클라이언트(Swagger)에 전달한다.
9. 느낀 점
결국 CORS 문제가 발생했던 이유는 스프링 컨텍스트의 생명 주기를 고려하지 않고 @Value를 남발했기 때문이다. 지금까지 @Value를 사용하면서 편리하게 환경 변수를 주입받았는데... 이것이 하루 내내 스트레스를 받게 할 줄이야...
이전에 CORS에 대해서 이론만 학습하였는데, 실제로 오류를 겪으면서 좀 더 확실하게 이해할 수 있었다.


